Pages

Search All Things 40K

Monday, March 5, 2012

Step-By-Step Khorne Berzerker (Black Legion)

Wow, I've been gone for quite a while and haven't really made any progress in my hobby in the time gone. It's a real bummer, but life(read:work) got in the way. Sorry for that.

Anyways, Khorne Berzerkers. For those of you that know the various armies I collect, you'll know my Chaos Space Marine army of choice is Black Legion. This presents me with a bit of a conundrum when it comes to the god-specific units. I was never really satisfied with the idea presented in the codex of simply painting a shoulderpad of the originating faction's colors (i.e. a red shoulderpad for a berzerker). You can see what I've come up with for Tzeentch's Thousand Sons here: glowing blue sorcerous runes on an otherwise Black Legion scheme. While I haven't painted up Plague Marines yet, I have done a Nurgle Sorcerer where you can see how I'd go about it. Khorne presented a different kind of challenge where I couldn't quite figure out something that was fitting. Here's what I ended up with:

Step 1: Charadon Granite
As is typical with my Black Legion, the basecoat for their armour is done in Charadon Granite. 

Step 2: Fortress Grey
Edge the armour plates in this light grey.

Step 3: Boltgun Metal
All the non-gold metal bits.

Stpe 4: Badab Black
Put it on everything.  This is how I like black armour.  Having a base color that isn't quite black allows for some depth that you wouldn't get by simply edging on a straigh-black armour.

Step 5: Shining Gold
For that Black Legion flair.

Step 6: Mithril Silver
Drybrushed lightly over the gold bits, this will make the gold look a bit aged and worn.

Step 7: Vermin Brown
I used this on the tassel for the chain-axe, I would also use it for anything you want to appear as leather.

Step 8: Elf Flesh
Extremely light drybrush over anything based in Vermin Brown.

Step 9: Devlan Mud
This goes over anything gold and/or brown.  OK, the basics for our Black Legion scheme are down, now for the Khornate part.  In the end, I went with a simple option.  No runes, no markings... just blood.

Step 10: Blood Red
I got out a ratty brush and spotted blood red all over his front (very little on the back).  I focused on knees, hands, axe-head, face and shoulders.  I wanted a real visceral feel to this, as if they almost go out of their way to spray themselves with their opponent's blood, and never bother to wash it off.

Step 11: Scorpion Green
For the eyes.


I added a bloody hand print on his shoulderpad after watching Lord of the Rings.  Sauruman's Uruk-Hai did this on their faces in white paint, and it struck me as suitably barbaric that would be embraced by followers of Khorne.  Now, I chose blood rather than white, and not necessarily on his face, but the result is the same: a kind of self-applied war paint in blood is how he shows his devotion.  I'm planning on placing these hand-prints in various places on the squad members.  Can't have too much conformity ;)

Tuesday, July 5, 2011

Step-By-Step Tau Devilfish

I'm on a bit of a transport vehicle kick right now, so out comes the Devilfish.

Step 1: Astronomican Grey
My previous paint pot of Space Wolves Grey was extremely thick.  I got quite a few comments about how many coats I claimed I used vs. how many other people had to use in their experiences.  Having a new pot, I feel their confusion.  You don't want to paint Space Wolves Grey on black.  So this is a bit of a basecoat so I don't have to do so many SWG coats.

Step 2: Space Wolves Grey
My Tau roll Bork'an.  The codex describes their color scheme as Space Wolves Grey with Hawk Turquoise highlights.  The accompanying picture was a flat out lie.  No way in hell that was Space Wolves Grey.  Turns out though ... I like the SWG and Hawk Turquoise scheme better. ;)

Step 3: Asurmen Blue
I paint my Tau differently than I do my other armies.  I usually paint everyone very bright, then wash them down.  With the Tau, I'm going for a bit of a brighter, cleaner look than is usual for my armies.  The Asurmen Blue is used in crevices to add a bit of shade and form definition.

Step 4: Skull White
In contrast to the Asurmen, this is edge highlighted to give the other side of the definition.

Step 5: Boltgun Metal
While you're getting all the actual metal bits, lay a few streaks down in areas that look like they'd take some hits.  I'll admit, I had a few to drink at this point and got ahead of myself.  This step really needed to come after the next one.  You want paint scratches to go over any possible paint.  I remedied this by adding the turquoise accents to non-scratched areas.

Step 6: Hawk Turquoise
Interestingly enough, the codex has a phonetic translator for the Tau alphabet.  I don't know the word for devilfish, so I just spelled out "devilfish - 1" using Tau letters.  Close enough.

Step 7: Chaos Black
Not to disparage anyone who chooses to use transfers, but they're just not my style.  I like to try and free-hand any logos I come across.  It's part of the challenge to me.  The key to any insignia is to just break it down step by step.  I'm going for a Bork'an symbol here (I know vehicles are supposed to display the T'au symbol, but whatev), so first, I want a black circle.  Don't worry about screwing up an edge... keep going, finish the circle, then pull out the Space Wolves Grey and touch up.

Step 8: Skull White
Smaller circle inside the black one.  Same idea here: if you mess up the edge, just get out the black afterwards and touch up.

Step 9: Chaos Black
Do each shape one at a time, touch up, move on to next shape.  For the Bork'an symbol, I found it easiest to start with the small circle, then the large area, and lastly the two filler areas.

Step 10: Badab Black
For all the metal bits.

Step 11: Devlan Mud
Ok, this I used on areas where there were metal scratches to dirty it up a little.  Also along the steps under the back hatch.

Step 12: Blood Red
Screens and sensors.  I'm going to do my usual 4-step gem tactic here.  Blood Red is the mid-tone.

Step 13: Scab Red
This is our dark area.  I'm applying this in the upper left area of the lenses as a large blob.  Should take up 1/3 to 1/2 of the lense.

Step 14: Blazing Orange
This is our highlight, and it goes in the opposite area as the dark.  I applied this in the lower right area of the lenses, as a line.

Step 15: Skull White
Depending on the shape of the lens, you'll want this as either a thin line or a dot in the dark area of the lens.

Well there she is; all trussed up and ready to act as mobile terrain for my Hammerheads ;)

Monday, June 13, 2011

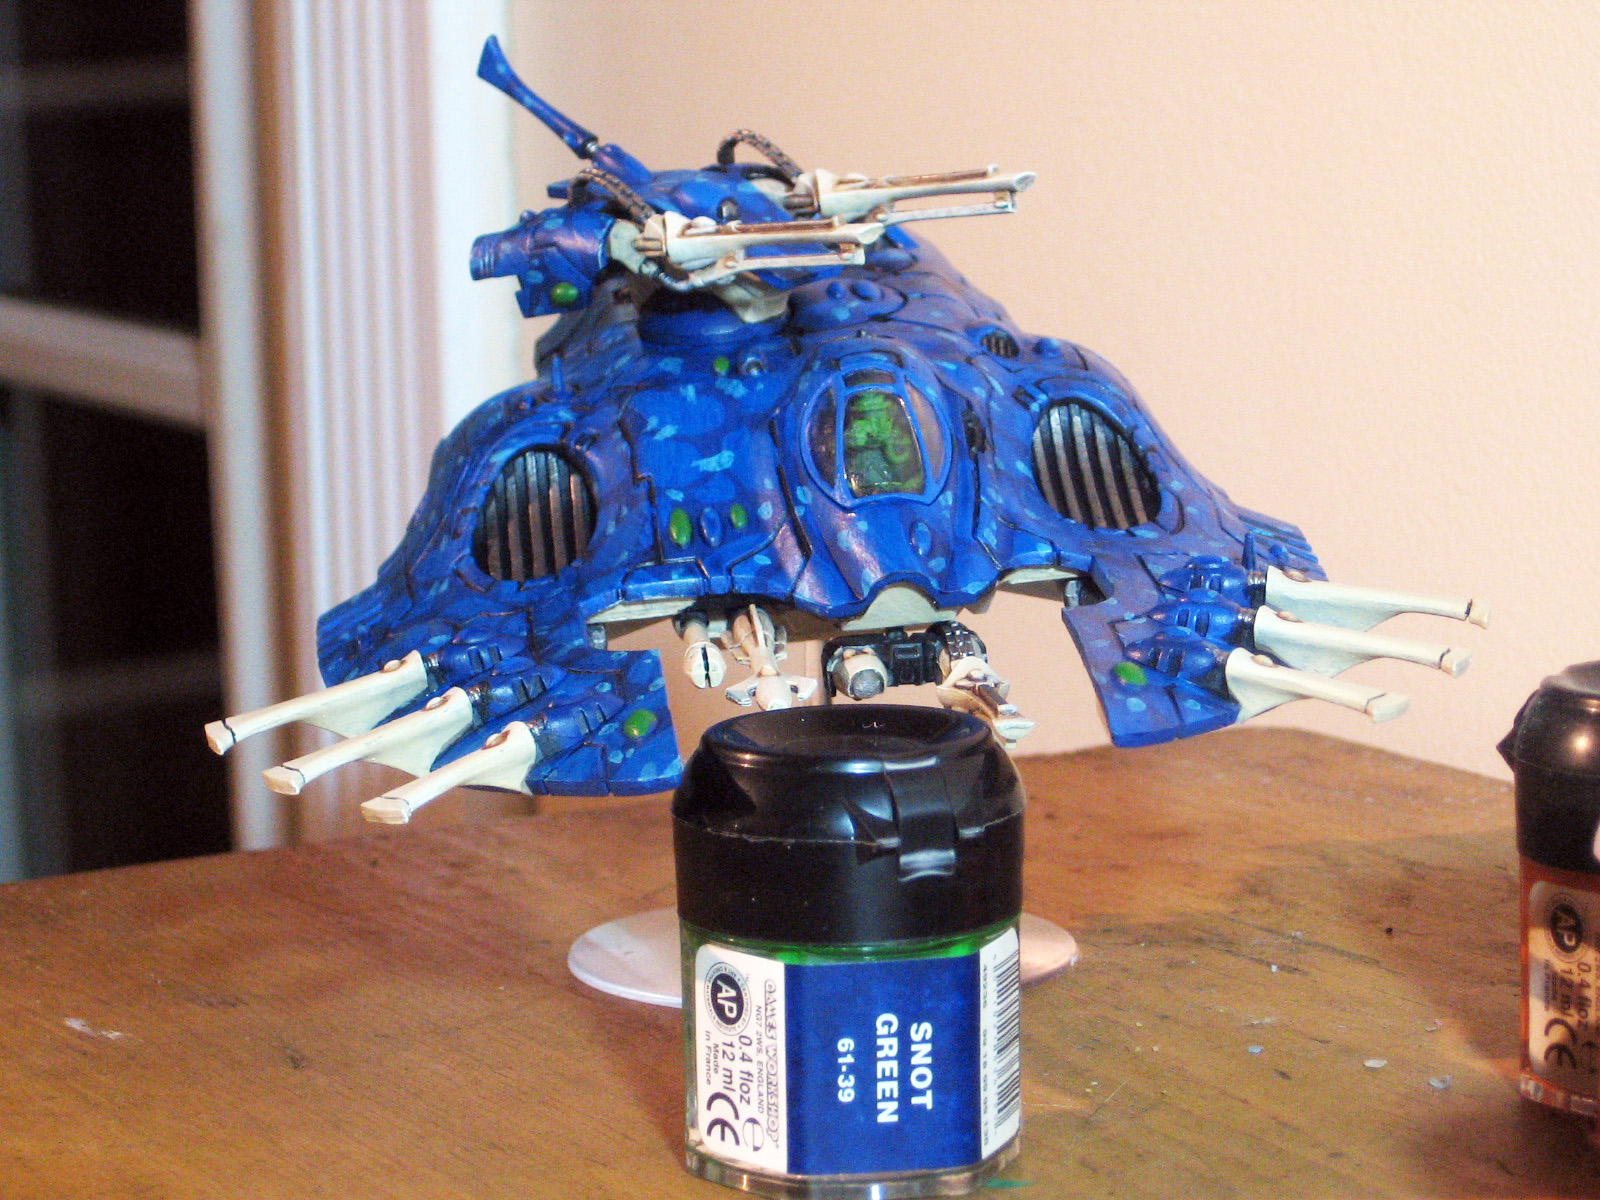
Step-By-Step Eldar Waveserpent

Still in an Eldar kinda mood, I painted up a Waveserpent as I am in sore need of some transports.  I took some pics along the way for those of you who are interested ;)

Step 1: Mordian Blue
I am assuming a basecoat of black before this, actually, so I guess there's a step 0.  Mordian is a foundation paint, and is thicker than your typical Citadel paint.  They're amazing for first coats.

Step 2: Enchanted Blue
I'm going for a mottled effect that's unique to the Alaitoc vehicles ... if the various examples in the codex are anything to go by...  There's not much of a plan here, just irregular shaped blobs, more round than sharp.

Step 3: Ice Blue
Smaller blobs, and try to break up the others... i.e. have them hug edges and break the lines between mid and dark blue.

Step 4: Asurmen Blue
The wash is here to not only bring some depth, but to tone down that Ice Blue, as it is actually too bright for what we want.

Step 5: Dark Angels Green
This is specifically for the pilot.  I'm going for an effect that looks like he's illuminated by his screen.  Do these in a heavy drybrush upwards along the body, so he looks a little under-lit.

Step 6: Snot Green
Same as step 5, but not as thick.

Step 7: Scorpion Green
Same as step 6, but lighter still.  We should be good to put the canopy down now.

Step 8: Dheneb Stone
For anything bone, this is our base.

Step 9: Devlan Mud
Dowse the bone.

Step 10: Bleached Bone
Staying out of any crevices, this is to work up the bone again.

Step 11: Skull White
This is a drybrushed highlight along the bone edges.

Step 12: Gryphonne Sepia
This is put in the creases and middle areas of the bone to bring some color back.

Step 13: Boltgun Metal
Drybrushed over the various metal areas of the ship.

Step 14: Snot Green
Ok, here we're starting on some of the various gemstones on the ship.  Any you want in green, first cover with Snot Green, our mid-tone.

Step 15: Dark Angels Green
The next step is to have a darkened area in the gemstone close to where the light-source is.  For simplicity's sake, I've chosen the "upper left corner" if I'm looking down at the front of the ship.


Step 16: Scorpion Green
The highlight should be a thin line along the "bottom right corner" of the gemstones ... or the opposite side where you put the dark area.  Normally the next and last step is to put a tiny dot of white in the middle of the dark space for the reflection ... but I'm going to work up a second color of gemstone first.

Step 17: Blood Red
Our mid-tone for any red gemstones.

Step 18: Scab Red
For the dark areas of our red gemstones.

Step 19: Blazing Orange
For the highlight line of our red gemstones.

Step 20: Skull White
Ok, apply your dots in the various gemstones ... and while the white is out, get any runes you want down.  I have a waveserpent rune on the side, and the sword of Khaine on the front ... the beginnings of the Alaitoc craftworld symbol.

Step 21: Iyanden Darksun
Yellow is a notoriously thin paint, so even for runes, I need to lay down a foundation paint first.  For the above, there is the crescent moon behind the sword, and a set of random runes down the left wing ... as it wouldn't be Alaitoc-y enough without more yellow ;)

Step 22:  Sunburst Yellow
Brighten up anything first done in Iyanden ... and there you go. 


Let me know what you think of the mottled effect and how it came out in the end.

Friday, June 10, 2011

Converted Eldar Storm Guardians

I'm looking to build some Storm Guardian squads for my burgeoning Eldar army for a few reasons.  One, they're highly flexible, given their ability to take fusion guns and flamers as special weapons while also being scoring.  Two, I have a feeling given the feel of the newer codices that this kind of squad is more likely to remain useful in a future Eldar Codex release so, to me it's a safe investment.

However, I don't want them to look like the normal Guardians.  I want them to stand out in their own way.  The idea to do this is not my own, it came from page 226 of the BRB where an example Eldar army is shown off.  The Storm Guardians were given hoods and capes from the Wood Elf Glade Guard kit.  I thought it was a fantastic idea, so here we are...

Upon receiving the bits, I came to the realization that the quivers on the cloaks would be a problem ... but promptly decided they were scabbards for the close combat weapons and added chopped hilts to those holding special weapons to drive home this intention.

Related Posts with Thumbnails

Google Analytics