Pages

Search All Things 40K

Showing posts with label Warhammer 40k. Show all posts

Monday, September 9, 2013

Step-By-Step Black Legion Daemon Prince


So this buddy has been sitting in my cabinets for a while.  I built him up before the new CSM codex, and afterwards, came to the conclusion that there was no place for him in the army :(
So into the cabinet he went, unpainted, while I focused on collecting and assembling what would make a good army.  

Now that I'm not focusing on armies as much, I looked into my model cabinet and saw all these great models with a renewed motivation.  I didn't care if they were viable in-game or not, I liked the models and dammit, I was going to paint them.

So, let's do a step-by-step on this model...

Friday, September 6, 2013

Space Marine Centurion War-Suits


So much of what made Warhammer 40K compelling to me was the fluff/setting.  The models are cool, sure, but I got involved back in 2nd edition; The models were OK then, but not great.  It was the fluff that held shit together, that made me want to act out battles between squads of stoic Dark Angels and a lithe and deadly strike-force of Eldar.  There was a serious cool-factor to the idea of that universe: Humanity in a technological dark age, having lost technology they once had, superstition and mysticism prevailing, the empire crumbling under the weight of bureaucracy...

Wednesday, August 21, 2013

M42

Dilemma:  I am in love with the fluff, background, and setting to the Warhammer 40K universe.  I am not in love with the game itself, nor GW's various practices.

So what's a fan to do?  It's been over a month since I aired some of my grievances in this post.  A month and a half of staring at cabinets full of 40K miniatures.  Each shelf reminding me of a particular project unfinished.  They're always unfinished.  Grand thoughts of collecting 2,000 pt. armies turned into buying sprees, then assembled models, then partially painted armies.  Even the models weren't the full 2,000 points most of the time, due mostly to the changing editions and codices.  Changes of those magnitudes meant portions of my already assembled/painted armies were less viable, and sudden additions to codices meant new models, keeping me in a constant state of consumption just to keep up.  Like a Warhammer 40K version of the Red Queen Hypothesis, haha.

I had mentioned before a thought that had occurred to me as a possible solution to this.  I was going to watch and see how GW handles this rules edition.  Will they update all the codices before shifting editions?  If so, I could snatch up the various 6th ed codices and just play 6th ed, regardless of future updates.  Remove the constantly changing environment, as it were, so that progress made in various armies actually felt like progress.  It would be foolish of me to put all my eggs in that basket, though, so let's look at an alternative...

Wednesday, July 24, 2013

Step-By-Step Possessed/Daemon Skin

I fretted about for a long time on how to paint possessed Chaos Space Marine flesh.  I want it to be some combination of what I would have done for normal human skin and what I would have done for daemon skin.  Here's what I got out of it.

Step 1: Rakarth Flesh
This is our basecoat, so lay it on thick.

 Step 2: Praxeti White
As a drybrush step, I picked the "dry" white paint.  We only want edges and raised areas picked out here.  Also, there will be a lot of washes, so don't worry if this comes out a little messy.

 Step 3: Reikland Fleshshade
This is the final step for what I would do if it were just normal human skin.  The idea here is to move forward and elaborate more to make it inhuman.

Step 4:  Druchii Violet
I love purple, and want this to end up being my unaligned daemon skin-tone.  I'm purposefully keeping the wash away from extremities here, notice the fingertips.  This is where I would normally stop for a Slaaneshi daemon's skin... and then elaborate with more pinks across the model... so we're going to keep going.  

There's some interesting stuff going on with the Possessed models, in that there are areas where it looks like the armour has fused with the daemon, and I want to play off of that a bit.  So our last step will be to bring the skin closer to the armour.

Step 5: Nuln Oil
This was applied where the purple flesh meets armour.  The overall effect is that the skin-tone itself darkens significantly in a way I like quite a bit.  It becomes a little harder to distinguish where armour ends and skin begins.

Note that the model itself is not "done" yet, as even in the face (which is incredibly dark, I know), I have yet to pick out the eyes and teeth in that last pic.  Here's what that looks like:


What do you guys think?  The effect works really well in my opinion due to the black armour... Not sure how it would look with other legions, though.

Sunday, July 21, 2013

Chaos


I had a couple Chaos models sitting half-finished on my desk for a while now... thought I'd put the finishing touches on them and move them into the cabinet with their comrades.  Given the new codex, I've got quite a few cultists to get painted up, blargh.  At least they look interesting, lol.

Friday, July 19, 2013

4-Step Power Weapon

There's a quick-and-dirty method I use for power weapons, that I've done before in some of the larger step-by-steps... but I thought it deserved its own post.

Step 1: Leadbelcher
Coat the weapon involved

Step 2: White Scar
Paint lines like electricity flowing along the weapon.  I usually cheat the lines a bit to follow edges

Step 3: Glaze/Wash
Given that I want this particular Power Weapon to be red, I chose the Bloodletter Glaze, but really you can substitute for any wash or glaze.  I've done blues, purples, greens, all to great effect.  All other steps remain the same in this tutorial, all you have to do is swap this step out for the appropriate color you want.

Step 4: White Scar
As the final step, go back in with the white and pick out some of the lines again.  Not all of them, mind, just the areas that you want to emphasize

Easy Power Weapons.  How does this look to you guys?  What do you do for Power Weapons?

Tuesday, July 2, 2013

Conflicted

I've been gone for quite a while now.  Most of you probably haven't noticed.  Suffice to say a lot of things  have been going on that have taken up my time.

I have a lot of strange feelings towards Games Workshop as a company.  I'm sure a lot of you can relate.  Their business practices often get in the way of what might be the "best move" for the customer, I feel.  Price hikes on metals, then on plastics... discontinuing bits store, issuing Cease&Desists to various third party bits vendors (whom I often turned to for the occasional final piece for a conversion I was working on), discontinuing supplements, etc.  For the longest time, one of these things has been how easily half of the army codices go entirely ignored for several rules permutations.  Now granted, this time around it does seem like they're trying to roll them all out for this current rules set ... though you'll have to forgive me if I'm a little hesitant.  For all that I seemingly "loved" GW and 40K throughout the years, I did get the feeling like I was in a kind of abusive relationship with GW.  I often considered just walking away.  

The same thing happened to me with regards to Wizards of the Coast and their Dungeons & Dragons franchise.  The constant supplements and re-issuing of rules sets just drowns you after a time in a feeling that it's never enough.  I always happily jumped to whatever was new out of their doors... but this last edition (4th) just took it all out of me.  I tried it out with some friends a few times and I just couldn't get past this feeling like it was just... disappointing.  It was just bad.  I went through a phase where I swore off D&D.  I felt betrayed, in a way... I know how silly that sounds, but we're talking about feelings here and they're often irrational.  Then I swore off the whole d20 system (switching to the d6 system developed by West End Games for similar type campaigns).  Lately some friends of mine brought me around to trying another D&D game (v3.5) and I rediscovered my love for it.  The great thing was that I didn't have to worry about constant revisions and additions to the rule-set.  Version 3.5 was done, and solid.  It was a strange and freeing kind of realization that I can enjoy D&D again without being run through the wringer by WotC anymore. 

So, back to Warhammer 40k.  Having toyed with the idea of just walking away from the franchise like I had D&D, the thought came of what to replace it with?  I started looking around for other miniatures games.  Most of them I couldn't get into because the models were terrible.  I looked for a long time at Warmachine, by Privateer Press.  It's probably heresy to even discuss Warmachine on a 40k blog, but there you have it.  I  purchased a model to paint (like testing the pool with your toes before jumping in):
Adeptis Rahn was fun to paint, and I could see myself getting into this... but I also had a tremendous sense of loss when I even considered it, especially when I'd look at all the painted 40k models I already had.  This was something more than the situation with WotC.  With them, it was just the collection of books and supplements.  This was not only a collection of books, but a collection of miniatures I had poured countless hours into.  Much harder to walk away from.  I had bought the Dark Angels and Chaos Space Marine codices... and stopped there.  The thought that came to me was that IF they rolled out ALL the army codices right here in this current rules edition... I might just have an opportunity to crystallize my 40k experience similar to D&D.  I would collect all the codices, and basically stop there, regardless of further released editions/codices.  I was never much into the tourney scene, so this was entirely feasible.  It was just me and a few friends who got a game in once in a blue moon.  The thought excites me, but I'm trying to moderate my expectations.

Further disappointing, was when GW announced that they were discontinuing the specialist game lines.  I had collected a few Battlefleet Gothic minis and courted ideas of playing that as well, and seeing that fall through was a further downer pushing me into a slump.  I looked at Firestorm Armada for a while, and like with Warmachine, nearly took the plunge on that as well... but I kept thinking "I'll collect them and just apply the 40k fluff to the Firestorm Armada minis and game system."  It was a sad thought, really.  I was so entrenched in the 40k universe I couldn't even consider getting into an alternative sci-fi board game.

Coming out of all that, I wondered what to do with this blog.  Let it die?  Change the format/topic?  How would that go over?  Should I open it up to gaming in general?  Post about video games I've played, or even D&D sessions?  This is an area I'm still conflicted on, to be honest.  I'd love to hear any of your thoughts on the matter.

Monday, January 14, 2013

5-Step Purple

I've been in a Tyranid kind of mood for a while, thought I'd share how I do purple with the new paint line.

Step 1: Naggaroth Night
This needs to be laid on heavy on all areas where you're doing purple.  It's very dark, but will show through on crevices.

Step 2: Genestealer Purple
I painted this rather heavily on all raised areas, leaving the Naggaroth to show through in recesses and crevices.  This is the main color for our purple, and is a little bright for my taste, but will be toned down by the end.

Step 3: Pink Horror
As this is a flesh tone for my Tyranids, I'm looking for a little variation in the highlights to keep things interesting (similar to how I use yellow as the highlight for Orks).  As a highlight, keep it to very raised areas, edges, or places you want highlighted to to object source lighting.

Step 4: Kindleflame
This is a dry paint, and is your final highlight.  Stick really only to edges and as finishing spotlights along very raised edges.  The model now should look way too bright, and that's usually ok in my book as I like to finish off with a shade to tone everything down and tie colors together.

Step 5: Druchi Violet
Lay it on thick.  This will help to blend the different colors you got going on and reign in the extremes

Monday, November 19, 2012

5-Step Gold

How to paint gold with the new GW paints.
Following out of the Black and Bone tutorials, let's get gold out of the way. If you're doing Black Legion, these three should get most of your model done.

Step 1: Balthasar Gold
This is a Basecoat step, so make sure you coat the area rather thickly. I used to basecoat my golds with a warm brown in the older line of paints, but now there's a metallic for that.

Step 2: Gehenna's Gold
This is brighter, and has more red in it than the basecoat. The idea here is that we're working up a few layers for an overall effect that you can't get with just one step; like getting Candy Apple Red on a car. Coat this rather liberaly over the gold area, keep out of the crevices. (also note, in the model above, I based the bullet chain out of the gun, but am not taking it further.  I actually want a coppery color for them.)

Step 3: Auric Armour Gold
Auric Armour is a very bright yellow color. The application will be similar to above, this isn't a highlight, we're using it as a layer... though don't lay this on too thick as it will overpower. Keep it to a thin layer.

Step 4: Agrax Earthshade
Now we're getting somewhere. With the basic gold layers all set out and looking bright and shiny, let's bring it down with some brown shade. This will give us the depth and definition we want as well as tone down the gold.

Step 5: Golden Griffon
Our final step is the highlight. Golden Griffon is a dry paint, meant to be used with a drybrush technique. With that in mind, dust this over edges and raised areas to give the gold that tarnished, aged look.

...and the gold is done!

Monday, October 29, 2012

5-Step Bone

Working on painting up some Chaos Terminators. On this model, I've done the 5-Step Black as well as a quick Leadbelcher plus Nuln Oil for the metal parts. Time to do the bone.

Step 1: Zandri Dust
Lay on the basecoat nice and thick.

Step 2: Ushabti Bone
Working with layer paints is interesting. Not thick like the base paints, you can get some good blends with little effort. This was painted in raised areas rather heavy-handed, just staying out of creases and the like.

Step 3: Screaming Skull
Screaming Skull was applied in similar fashion to the step above, but less of it, and not covering as much area. Raised areas, and large flat(ish) surfaces like the forehead of that giant skull, but staying even further away from creases in order to let some of the Ushabti Bone layer show through.

Step 4: Seraphim Sepia
Shades are my best friend. It's a shame there's only 4 glazes, otherwise I'd probably make a 6-step, but we're going to use the Sepia as both a shade and a glaze. It should smooth out the transitions between the two layer paints as well as give a nice dark shade.

Step 5: Praxeti White
This was very lightly dry-brushed over edges and the like to highlight. Don't get too heavy handed with this as there is no glaze step afterwards to smooth it out.

Monday, October 22, 2012

5-Step Black


Painting black armour (or white, for that matter) always poses a problem, because you're typically missing out on either a shade or a highlight. If your midtone is white, you've got nowhere to go for a highlight. If your midtone is black, you have nowhere to go for a shade. So, what's the answer to this? For me, it's to fake to an "almost black" (and likewise, an "almost white" in the other case). Given that the new Chaos Codex came out a little bit ago, I got bitten by the bug again to get back to my Black Legion. It also helps that I just recently switched jobs to a much more sane work schedule, allowing me time to actually enjoy a hobby again, praise the Emperor.

So I've been playing around with the new paints, and I kinda like them. The "dry" paints were weird at first, but I'm really starting to dig them. In my playing around, I've found the basic guide on GW's site to actually be quite helpful (Link). Their color suggestions for "sheer black" looked promising, but after trying it out, I preferred a different order...

Step 1: Abaddon Black

Or the old "chaos black" ... same thing, new name. I generally base the whole model with this, so I rarely even call it a "step"

Step 2: Eshin Grey

I painted this over all areas that I intend to make black, while keeping it out of crevices. This is our mid-tone black, which will be made darker after the last step.

Step 3: Dawnstone

This is our first highlight. I use it to line the edges of armour that is in dark areas, and lay it on a little thicker in areas that should be brighter due to light source.

Stpe 4: Longbeard Grey

This is our second highlight. Use it sparingly, and only in areas that really need it. For example, if it's an area that was heavily applied with Dawnstone due to light-sourcing, then edge with Longbeard. If it's a darker area where you only edged with Dawnstone, don't use Longbeard.

Step 5: Nuln Oil

This should bring everything back down to a darkness that is favorable for black armour. In addition, it helps the different greys blend in a little more. We're using it as a shade AND a glaze! Bonus! :D

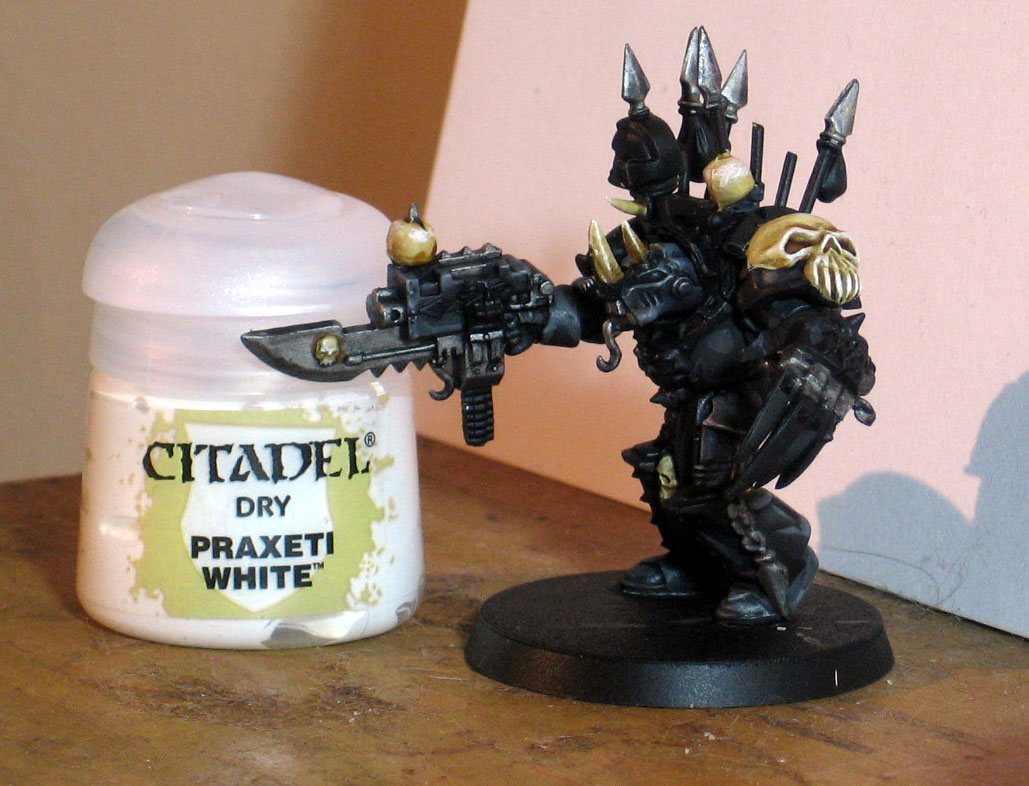
It might be a little hard to really see the "black" because the rest of the model is still left in its Abaddon Black basecoat, and is thus darker, so...


Here's the finished model to give you an idea of how that black fits in with the rest. It's not really the final step for this particular model, to be honest, because I like my Khorne Berzerkers a bit bloodsplattered ... but skipping straight to that step would kinda defeat the purpose of showcasing the black armour.


And here's the blood-splattered version, in-case you were wondering. :)
Let me know what you think!

Monday, March 26, 2012

Step-By-Step Imperial Guard Vehicle (Sentinel)

My Imperial Guard are a brown version of the Cadian Guard.  Just putting that out there before we get too deep into this and you're like "Wait a minute.  That's not the right color."

I don't know what to do about this new color range GW is bringing out.  I might have to put these Step-By-Steps on hold until I figure out what colors are equivalent and which ones aren't.  For now, the colors are the old ones.  I might post a few color comparisons when I get some of the new colors in, so we can all see just how they all line up.

Step 1: Basecoat
Also note, this model is magnetized.  I'll be showing the various weapons attached throughout the tutorial.

Step 2: Calthan Brown

Step 3: Dheneb Stone
Yay for patchy camouflage!

Step 4: Skull white
This was edged/drybrushed over the areas that were painted in Dheneb (except for the bone/skull parts).

Step 5: Kommando Khaki
Edged along the Calthan Brown parts.

Step 6: Boltgun Metal
All the mechy bits got coated, as well as a few strategically placed scratches and scuffs along the armour plates.

Step 7: Shining Gold
Autocannon bullets, aquilas, winged skulls, etc.  We are now ready for washes.

Step 8: Devlan Mud
This goes over all the brown, dheneb stone, and gold.

Step 9: Badab Black
This was applied to all the Boltgun Metal bits.

Step 10: Ogryn Flesh
For the little dude's face.

Step 11: Bleached Bone
This was a heavy drybrush along the skull to bring some color back.

Step 12: Skull White
A much lighter drybrush on the skull.

Step 13: Gryphonne Sepia
Applied to the sides and forehead of the skull.

Step 14: Enchanted Blue
This is the base color for the targeting lens and the pilot's visor.

Step 15: Regal Blue
Applied in the upper left area of the targeting lens and visor.  The white dot will go in this area later.

Step 16: Ice Blue
This was applied as a line along the lower area of the targeting lens and visor.

Step 17: Skull White
The light-reflection dot in the dark blue region of the targeting lens and visor.  While I had it out, I put the Company number on the side and painted the missile heads.

There we have it.  Let me know what you think.
Related Posts with Thumbnails

Google Analytics