Pages

Search All Things 40K

Monday, May 23, 2011

Step-By-Step Grey Knights


A 5-man Strike Squad with Psycannon ... to be mounted in a Razorback.

Step 1: Boltgun Metal

I toyed with the idea of using Mithril instead, but for one, I'd be left with nothing to highlight, and for another it's just not grim-dark enough.

Step 2: Badab Black
Ok, maybe a little too grim-dark.  With the depth added, I'm going to highlight in silver.  I usually highlight before a wash, but in this case, the silver actually gets lost in the wash, so it will come afterwards.

Step 3: Mithril Silver
Note that I did not do my usual line-edge highlighting.  This was more of a drybrush effect, and I tried to highlight only areas that stood out and from the top down, to emulate a kind of subtle source lighting.

Step 4: Asurmen Blue
For creases and low areas, to add further depth and break up the monotony of an all grey model.

Step 5: Shining Gold
These models have so much detail it's insane.

Step 6: Mithril Silver
Very lightly drybrushed over the golden parts.  This would be followed up by a Devlan Mud wash, but we're going to set up a few other colors that will also use the same wash first.

Step 7: Mechrite Red
GW's team paints the bolter casing black, but I think that's boring, there's not enough red.

Step 8: Blood Red
Covering anything in Mechrite.

Step 9: Macharius Solar Orange
I used to highlight reds with Fiery Orange, but that's been discontinued.  I tried Blazing, but it was too dark, so this foundation paint has taken up the role.  The reds are now ready for Devlan Mud.

Step 10: Dheneb Stone
Purity Seals, Cloth, Scrolls, Skulls.

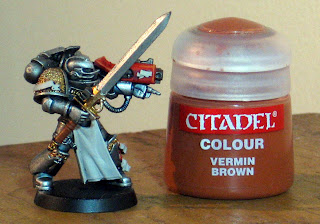
Step 11: Vermin Brown
Sword handle (and if he had any belt pouches)

Step 12: Devlan Mud
Used on all the gold, reds, creams and the sword handle.

Step 13: Bleached Bone
Moving on with the skulls, scrolls, cloths and purity seals, we're bringing back the color a bit.

Step 14: Skull White
A few things happening here...  The skulls, scrolls, cloth and purity seals are lightly drybrushed along edges and raised areas, the eye-lenses are picked out, and there are now bolts of lightning painted onto the blade.

Step 15: Gryphonne Sepia
To finish off the skulls, scrolls, cloth and purity seals, this was added to the recessed areas.

Step 16: Asurmen Blue
In the eye-lenses and on the blade.

Step 17: Skull White
I've dotted the eye again to make it look like it's glowing, and partially re-traced the bolts along the sword.  You want some of those bolts to remain covered by the wash.

Step 18: Chaos Black
This is for scribbles on scrolls and barrel-holes in guns.

Step 19: Calthan Brown
We're almost to the end, just doing the base now.

Step 20: Basing sand

Step 21: Devlan Mud
To finish off the sand.

Well, there we are.  The method is actually quicker than with some other armies, probably because I don't have to line edge the armour.  Awesome, that means more time to spend painting more models (I'm such a glutton for punishment).

Bonus Draigo!
With one exception, Draigo was painted using the exact same method...

...that exception being the little bit of Thraka Green at the end of his blade to make it interesting/unique.

Tuesday, May 17, 2011

Grey Knights test-model

I know there's not much to a GK color scheme, but as is typical with me, I need to test it out on one model first before I apply to the lot of them. Expect a step-by-step soon.

Friday, May 6, 2011

What? I'm Stylish Now?

I got a nomination for the Sylish Blogger Award. A big thank you to Klaus from DEI GRECI. Go check out his blog, he's stylish too ;)

This award is an interesting way for us bloggers to show appreciation for each others' work and efforts in the community, and I'm happy to be a part of it. It works kinda like a chain letter, but with no scary "don't forward on to 10 people, and you'll die in a horrible fire" voodoo going on. Just positivity.

Here are the rules:

-- Thank and link back to the person giving you the award (see above)
-- Share seven things about yourself
-- Select 10-15 blogs who you think deserve this award
-- Contact these bloggers and let them know about the award


Seven things, huh? Let's see what I can come up with that would be interesting. My work-history is riddled with crazy accidents and occurrences that seem astounding to some, but I've sort of become accustomed to crazy. Note these are ALL true stories, hit me up in the comments if you would like me to elaborate on any.

1. I got a job as a bus driver in college as a result of being physically thrown through a bus windshield during an almost-accident. I was late for my biochem final at the time, so instead of sticking around for the authorities, I ran the rest of the way to the lecture hall, covered in bits of safety glass. When I didn't sue the school, they offered me a job driving buses.

2. I got over my fear of bees, and promptly regained it during the same job. Out of college I worked as a quality assurance microbiologist for a sugar mill. You can imagine bees are a problem, but due to the availability of sugar, they were extremely docile. You could wave them away, and they'd wait for you to leave. Just as I was getting over my since-childhood fear of them, a silo accident left me covered in sugar syrup... then covered in bees. I freaked.

3. I was locked in a walk-in freezer overnight. Another while-in-college job was at a restaurant. Working late to help the manager take final stock before closing up, she forgot that I was in the freezer, locked up (we locked our walk-ins with padlocks), shut down and left for the night. Luckily the freezer had a shut off switch on the inside ... but the mayo didn't smell too nice the next morning.

4. I was once quarantined for Anthrax exposure. Out of college, I worked as a clinical microbiologist for a large lab. While working in the fungal department, I came across a strain I didn't recognize, and had the fungal supervisor check it out. He thought it was anthrax, and raised the alarm, sealing us in the fungal room for a couple hours. It turned out not to be anthrax, but still...

5. I was once blown out of a vehicle by a commercial jet engine. Another while-in-college job was working in Air Freight at LAX airport for a major air-liner. I worked graveyard shift, and one of my duties was to collect those luggage carts, attach to the back of my go-cart/tractor and return them to Air Freight for the next morning. A pilot decided to turn on one of the planes after-hours just for kicks while I was underneath it. I had a few seconds to react by driving away from it, but it still knocked me out of the go-card, and slid me down the tarmac. He was fired.

6. I once got sprayed with Iodine and looked like an oompa-loompa for a couple days. While working at the same job as #2, we would routinely hire exterminators to control the bee population. I walked around a corner just as he unleashed his back-pack-canistered sprayer at a cloud of bees. Fun fact: Iodine stains your skin deep orange (and is slightly radioactive).

7. I was once held at gunpoint. After I left the microbiology industry due to the health hazards, I entered the advertising industry as an analyst. Did some overtime one summer Saturday, had the whole office building to myself. Got so hot the fire alarm went off. I braced the door with a newspaper for the fire department while I went looking for the source. Apparently bracing the door for them only makes them send the cops in first to check for intruders.


OK, on to the bloggers that I feel should get this award. Please keep in mind that there are WAY more than 10 that deserve it. Feel free to scroll through the blog list to the right for the full list.
In no particular order:

The Hogs of War is a great place for hobby, minis, opinions and gaming in general.
Space Wolves is your go-to place for anything relating to our much loved space vikings.
3++ Is The New Black is an amazing resource for tactics and list-building in a no-nonsense attitude.
The Inner Geek is basically my hobby brother-in-arms. His shit is boss.
Black Matt's Black Legion Blog is a great place for hobby and gaming focused around spikey marines.
Dark Future Games Contests, tutorials, awesome painting, it's all here.
The Back 40K SandWyrm's color-theory articles are invaluable, and the blog's painting and tactics commentary is superb.
The Painting Corps has tons of tips and how-to's around painting and converting.
Musings of a Metal Mind Is a great blog for those of us who like all things machine (even outside 40K)
From the Warp OK, I know this is kind of a cheat. I do know he's already been nominated, but Ron deserves it. I'm seconding (or thirding, perhaps) his nomination >;)


Thanks again to Klaus for the nomination! Much appreciated. :)

Thursday, May 5, 2011

Community Spotlight


There's a lot of awesome stuff floating around the 'nets these days, and I figured I would shed some light in the direction of a couple blogs/projects that caught my eye in the last week. Might become a regular feature...
If you haven't already seen these, go check them out.

Over at The Inner Geek, Brian's been continuing his Titan building process. It's been fascinating to watch, and the details are glorious. ...now if only I had enough disposable income to do that kind of thing myself... or a fancy top hat to pawn, as was the case with Brian, apparently. ;)


Adam over at Space Wolves is hosting a weekly web-comic, and boy does it look fantastic. The art style is quite envious (the artist is Nacho Fernandez -comic artist extraordinaire!). I've played with doing the occasional web-comic myself, but my style is not nearly as refined as his. Amazing work.


Jawaballs is in the process of making another life-size banner, this time for the guys at Hogs of War. Jawa's banners look amazing, and I've been considering commissioning one myself.

Monday, May 2, 2011

Step-by-Step Dark Eldar Wyches


Step 1: Charadon Granite
Wyches are half leather-half armour, charadon granite is for all the leather bits.

Step 2: Fortress Grey
This was drybrushed very lightly over the charadon granite parts.

Step 3: Badab Black
Doused over the same area. Our leather is done, now we can move on to the flesh...

Step 4: Dheneb Stone
Note that I'm intending on making her loincloth thingy "flesh" as well. We'll differentiate between it and hers with the washes.

Step 5: Skull White
Drybrushed over all things Dheneb, to bring out those details and highlights before we wash them down.

Step 6: Ogryn Flesh
Usually I would wash rather heavily to get a good amount of this in there, but I'm actually going for a somewhat pale skin, so I used it lightly.

Step 7: Gryphonne Sepia
Heavily used on the loincloth.

Step 8: Vermin Brown
This is the secondary leather color. There are a couple belt pouches and the cords to wrap her hair up that are being hit with this color.

Step 9: Elf Flesh
Elf Flesh is my new drybrush highlight for any leather based in Vermin Brown. I used to use Bronzed Flesh, but GW discontinued it. This has been a good replacement.

Normally my next step would be to finish off this secondary leather with a Devlan Mud wash ... but there are a few other areas that will be finished with Devlan Mud, so I'll set those areas up first.

Step 10: Shining Gold
Areas on the gun, jewelry, weapon hilts, and the zipper.

Step 11: Mithril Silver
The main part of the pistol and the blade are covered with silver, as well as a light drybrush over the gold areas. The gold is now ready for Devlan...

Step 12: Blood Red
My DE hair is red, to offset their teal/cyan armor color.

Step 13: Macharius Solar Orange
Drybrushed over the red hair, as well as applied to the various tubes running from backpack to various areas of the body ... I assume it's their drug supply. The red is now ready for Devlan...

Step 14: Devlan Mud
I think Devlan Mud is my favorite wash. This was applied to the secondary (brown) leather pieces, the gold, the silver weapons and the hair. I found the mud on silver to be an interesting and novel effect that I'm going to use for all of my DE.

Step 15:
OK, we're on to the actual armour proper now. This is the part that will cover most of the DE warrior models. I wanted the color to be near-black at the flat ends, highlighted to teal/cyan at the edges... to accomplish this, I based the area in Necron Abyss, a very dark blue.

Step 16: Enchanted Blue
This was used to make a rather thick edging along the plates. I say thick because it needs to show underneath a thinner edging line...

Step 17: Ice Blue
Thinly edged along the armour plates.

Step 18: Thraka Green
This was applied heavily to the blue armour plates. This is the step that adjusts everything from a blue to a teal/cyan color. If you liked the blue look better, consider using Asurmen as your wash instead.

Step 19: Shining Gold
Now that the armour is done, we can hit that little embossed detail on the glove with gold.

Step 20: Mithril Silver
This was used to touch the various spikes and studs protruding from the armour/leather.

Step 21: Bleached Bone
For the pick in her hair.

Step 22: Astronomican Grey
OK, I'm not sure if you had realized earlier, but there was a tiny bit of conversion work at play here, I attached a vial that I got from a Blood Angels sprue to the base of the sword's blade ... this is to be a Venom Blade. The grey is the vial's basecoat.

Step 23: Snot Green
Apply to the sword's blade as well as in the vial. Keep a level line with the ground to create the illusion of an actual fluid in the vial.

Step 24: Scorpion Green
A further highlight along the blade and in the vial.

Step 25: Skull White
A tiny vertical line along the vial for a shine to complete the effect.

Step 26: Calthan Brown
A basecoat for the base.

Step 27: Static Grass
I also found a bit of shrub to slap on there.

Well? Let me know what you think. I took a while deciding what kind of basing to use with them. I have 5 armies on a bleak brown rock-type base, 2 on snow, 2 on urban, and only 1 on grass (the Eldar). Part of me found it fitting that the DE should share the same basing as the Eldar, and the other part found it rather blasphemous. In the end, I think they look like they kind of don't belong there ... and I think I like that look.
Related Posts with Thumbnails

Google Analytics