 I just recently finished painting my Broodlord as another HQ unit for my ever-growing Tyranid horde. And, in celebration of being the first model painted on the new workspace, I'll take you through the painting process of this model (lovingly referred to by the online community as "Pavarotti") step by step.
Step One: Spray coat of black primer

Step 2: Basecoat consisting of a 2:1 mix of Warlock Purple : Dheneb Stone
 "Why am I so pink!?!"
Step 3: Leviathan Purple wash (heavy):
 Much better. Typically with organic effects like skin, I will only do 2 steps; basecoat and wash. With other effects (bone, armor, etc) I will add additional washes and highlight steps to bring out the contrast, but this is where I like skin effects to be. Too much contrast in a skin effect starts to look very cartoony for my taste.
Step 4: Drybrush of Codex Grey on black carapace:
 Carapace and bone effects do wonders with drybrushing. Drybrushing will typically leave a grainy like appearance which I find ideal for bone and chitin.
Step 5: Dheneb Stone basecoat of all bone:

Step 6: Devlan Mud wash(heavy) of all bone except teeth:
 As mentioned above, if this were skin I would stop here, but I want more contrast out of the bone, so on to the drybrushes...
Step 7: Heavy drybrush of Bleached Bone:
 Not enough contrast. One more drybrush to really bring it out...
Step 8: Light drybrush of Skull White:
 Awesome. Now the dark areas (Devlan Mud) are right and the brights are right, all that's left to bring this together is a little strategic application of a mid-tone wash to blend this in...
Step 9: Strategic wash of Gryphonne Sepia:
 By "strategic wash," I mean laying it on only in specific areas, as opposed to covering all of the bone. keep it heavier towards the base of the scythes/claws, where the Devlan Mud has made it darker, and don't touch the white highlights; you want to blend the mid-tones, not the brights.
Also, above I have tossed in a step, which is touching the eyes with Skull White.
Step 10: Bad Moon Yellow on the eyes:
 After having already hit the eyes with white, we can go over them with Bad Moon Yellow and have them come out nice and bright. Normally, Bad Moon Yellow is a tremendously weak paint, and will take you forever to bring up from a dark. Because of this, I will always paint whatever I want to be bright yellow first with Skull White.
Step 11: The tongue:
 I've applied a little Baal Red Wash to the base of the tongue, and after it dried, followed it up with 'Ardcoat, since it's a wet surface.
When I painted my Hive Tyrant, I took you all through the evolution of my Tyranids' colour-scheme. The picture above is what my Tyranids' first incarnation looked like. Purple and black. The claws and bone stuff stood out wonderfully, but the rest of them just blended together in a way I didn't find satisfying.
Step 12: Blood Red on the face:
 At some point, I had played with a flash of colour about the face, and settled on red. The effect was glorious; the most vicious features of the Tyranids came out in their contorted and bestial faces. The red also made them look absolutely savage. The above incarnation is where my Tyranids stayed for a while, though the carapace always did look less than satisfactory to me...
Step 13: Fiery Orange carapace highlights:
 It wasn't until my friend Aernout started painting Tyranids (in a great teal and turquoise scheme) and incorporated a bright yellow pattern on his turquoise carapace that it struck me to do this. You find this kind of thing in nature on poisonous and tropical insects, so it wasn't out of the question to integrate this into my hive's carapace scheme... to this day, I still love the effect.
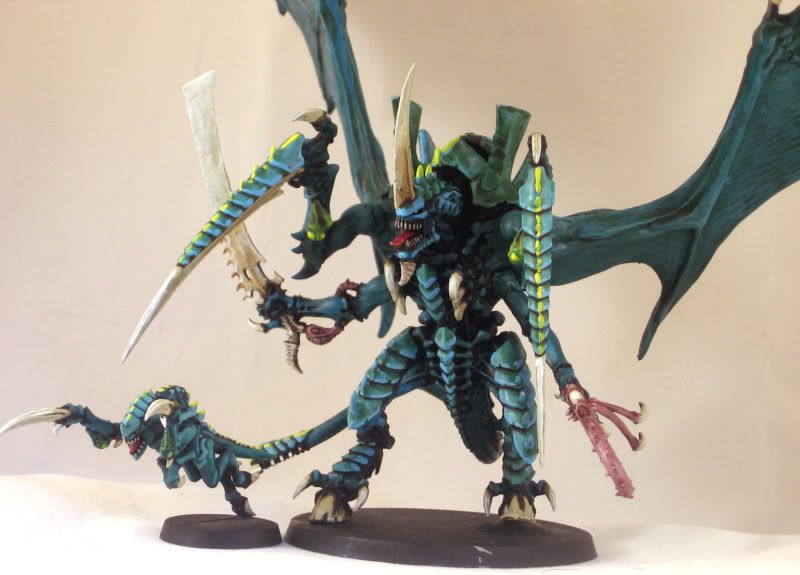
Step 14: The basing:
 Ok, ok, the basing is actually a couple steps in itself... I'm just being lazy.
First, I basecoated the top of the base Bestial Brown.
Next, I glued down some basing sand (I used the GW stuff).
Then I added a layer of diluted PVA glue (Elmer's) over the sand to keep it from coming off.
Now, a heavy coat of Devlan Mud to bring the color down closer to the Bestial Brown basecoat.
Lastly, a drybrush of Graveyard Earth (if you want more contrast, try Bubonic Brown).


Well? What do you guys think?
Do you find the step-by step useful? If so, I can start incorporating my future posts with the same.