Anywho, on to business. :)
 I have 4 Carnifex kits that I stocked up on long before the new codex release. Imagine my dismay when I found out how the carnifexes got nerfed! I had already assembled the above, and decided he was to be Old One Eye, as that character actually seemed worthwhile, though expensive. The other three shall be converted into a Tyrannofex, a Tervigon, and a Harpy.
Step 1: Basecoat

Step 2: Mix of Warlock Purple and Dheneb Stone
 The ratio I used was 2 parts Warlock Purple, 1 part Dheneb Stone.
Step 3: Codex Grey Drybrush
 Apply lightly to the already black carapace.
Step 4: Fortress Grey Drybrush
 This was drybrushed even lighter along carapace edges.
Step 5: Heavy Leviathan Purple Wash
 Cover all that "way too Slaanesh" pink.
Step 6: Dheneb Stone
 Here comes that 5-step bone effect. Base in Dheneb.
Step 7: Devlan Mud Wash
 Heavy wash, get it dark in all cracks/crevices.
Step 8: Bleached Bone Drybrush
 We're bringing the color back.
Step 9: Skull White Drybrush
 Applied light and mostly along edges.
Step 10: Gryphonne Sepia Wash
 This is the final step for the bone. Apply strategically, along the mid/deep areas of the bone. Near the roots. Leave the Skull White edges alone.
Step 11: Blood Red
 Along the face.
Step 12: Fiery Orange
 My bugs have bright warning signs along their carapaces. I chose Orange to play off and stand out from the current color scheme. Mine is meant to be garish and contrasting. There are other effects that are more in-line with the color scheme, yet still make a statement.
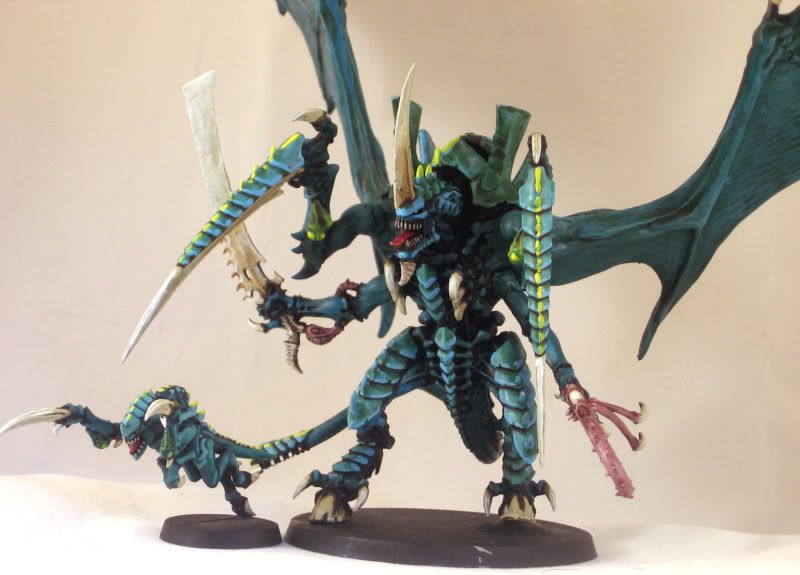
Step 13: Dheneb Stone
 This is for the tongue. I've found that Dheneb Stone looks a lot like lifeless flesh. Applying a wash to it to give it life tends to look good.
Step 14: Baal Red
 Ah, a fleshy red tongue.
Step 15: 'Ardcoat
 Again for the tongue. Makes it look slimy. Ick.
Step 16: Calthan Brown
 Basecoat for the base. I'm going with my typical brown barren dirt scheme for the 'nids.
Step 17: Basing Sand
 Put down a layer of glue. Cover with Basing Sand. Allow to dry. Coat with watered down glue to seal so you don't get those annoying bits of sand coming off later.
Step 18: Devlan Mud Wash
 Done! :D

What do you guys think? Anything in there you found useful? Anything you'd have done differently? Lay it on me in the comments section.