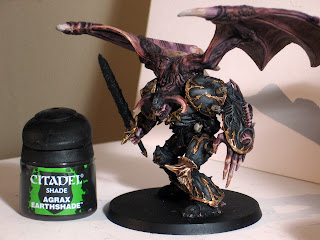
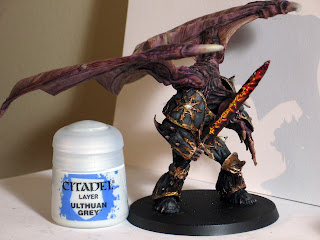
So this buddy has been sitting in my cabinets for a while. I built him up before the new CSM codex, and afterwards, came to the conclusion that there was no place for him in the army :(
So into the cabinet he went, unpainted, while I focused on collecting and assembling what would make a good army.
Now that I'm not focusing on armies as much, I looked into my model cabinet and saw all these great models with a renewed motivation. I didn't care if they were viable in-game or not, I liked the models and dammit, I was going to paint them.
So, let's do a step-by-step on this model...
Step 1: Black basecoat
I did order a can of grey spray primer, so I'll start playing with that soon, but it didn't come in time for this guy. First up, I'm going to work on the black armour itself. This is the same technique in the 5-Step Black. The only real conversion here is swapping out the backpack for a set of WHFB dragon wings. There's also a good amount of greenstuff just to close up some of the seams.Step 2: Eshin Grey
I covered most of what is to be the black armour in Eshin Grey. The idea here is to make the base color a dark grey, so that there's room to add depth (via Nuln Oil). If I were to keep the base color actually black, it would lack depth.
Step 3: Dawnstone
This is a middle-highlight, keep it to raised areas that would be brighter, given your lightsource. I'm not doing any object-source-lighting here, just a standard overhead light-source. In areas where there is a lot of room (shoulderpads) I've used this to leave streaks instead of a solid coat, in order to suggest more texture than is there.
Step 4: Longbeard Grey
Half of my pots of "dry" paint from Citadel have dried up, ironically. And not in the "that's how they're supposed to be" kind of way, either. This one's still good, though. If yours went bad, or you don't have it, use or mix an off-white grey. I used this mainly to pick out areas further that the Dawnstone didn't. Mainly edge-work and limited raised area highlights.
Step 5: Nuln Oil
This is where the black armour effect is finalized. Douse the areas we've been working on. This will bring everything down to a suitably dark level.
Step 6: Rakarth Flesh
Now that the black armour is done, I'm going to work on the daemon flesh effects. To note, I'm using the same technique I did earlier in the 5-Step Daemon Skin post. As this is a basecoat for the flesh, cover everything. Also note that I applied this to the skulls adorning his armour too. This is also a good bone basecoat.
Step 7: Praxeti White
Another dry that survived the great dry-up. This was drybrushed over the Rakarth Flesh areas (minus the skulls, we'll get back to them later). This is all going to be under a wash, so I'm looking to get surface highlights that will show underneath. Usually if I skip this step, the model looks oddly flat.
Step 8: Reikland Fleshshade
Were this some normal dude and I was just going for a caucasian skin-tone, this is about where I'd stop. Note that I've left the skulls alone; we'll get to those later. Also, I did not apply the wash entirely over the wing talons. I want a little bit of just the bone color up there at the tips.
Step 9: Druchii Violet
I aimed to get this mostly in crevices, and keep it away from tips of things, like his cheekbones, horn tips, finger tips, etc. You want some of that fleshtone to show through.
Step 10: Nuln Oil
Like with the previous step, I went for crevices, only more so. I want some of the purple to show through so that this is a gradient from nuln to druchii to reikland. Also, anywhere where the flesh touches the black armour, I hit with Nuln oil, to attempt to blend the line between armour and flesh.
Now let's talk about the wings, because they are pretty much their own subject here:
The actual limbs and crevices got both the purple and black washes, as you can see. The flaps in between got less, so that there's a clear contrast. Along the flaps, I used the gashed crevices as guides for where to streak the purple wash across. I want those to look kind of like stretch marks. When it came time for the Nuln Oil, I made little streaks, trying not to put as much down as the purple. When that was done, I finished off by stippling a few blotches here and there with the Nuln Oil just to break up the surface a bit more and take away some of that uniformity.
Step 11: Balthasar Gold
This is the basecoat for all that gold trim. A nice brown metallic.
Step 12: Gehenna's Gold
This paint pot is temperamental for me. I always need to shake it up more than any other, as it likes to separate into a thin red layer on top, and the actual gold on the bottom. It should come out like an orange gold. The idea here with the different layers is to build up to something that looks better for all the layers underneath, like a candy-apple-red paint job on a car.
Step 13: Auric Armour Gold
This is where I try to not cover up all of the previous step, but still most of it.
Step 14: Runefang Steel
In my previous 5-Step Gold tutorial I suggested a dry paint highlight (Griffon) after the wash. That pot dried up, so I'm doing a different technique to get a similar effect. I'm using Runefang Steel as my drybrushed highlight... but because of how bright it is, we're putting it on before the wash.
Step 15: Agrax Earthshade
Two things happening here. I doused the gold parts to finish them off... and hit those skulls that had been left alone for a while.
Step 16: Ushabti Bone
I'm picking out places to highlight on the skulls, and also carefully picking out his teeth. The teeth were done easiest by drying the brush off, then using the side of the brush along his teeth.
Step 17: Screaming Skull
The final highlight for those skulls.
Step 18: Averland Sunset
OK, the vision I had for his sword is kind of similar to the effect I did on Skulltaker's sword: a kind of darkened glowing blade, like it was filled with lava. For that, I mainly used washes to darken the flats... but this sword has runes carved in it, and I want those to be brighter than the flats. Because of that, washes will be difficult to keep out of those crevices.
Step 19: Flash Gitz Yellow
I'm only caring about getting this in those cracks.
Step 20: Evil Sunz Scarlet
After initially drybrushing around the runes, I covered the rest of the blade. The rest of the effect will be done with Nuln Oil to give the effect I want.
Step 21: Nuln Oil
This was a very careful step. I placed wash on the blade in blotches, touching here and there to put a bead of black wash down. The blotchy effect is great, and at the time I thought it was still to bright and moved on to a second application. I now think I should have stopped at this step, honestly. The mid-tones look better.
Step 22: Nuln Oil
Here you can see what I mean. I went in to darken the blade further, and I'm not sure it was an improvement.
Step 23: Leadbelcher
There are a couple metallic bits on this guy. Chains hanging from various areas, a Necron's head tied to his waist, and some cabling spilling out of his guts like intestines. All coated with the Leadbelcher.
Step 24: Agrax Earthshade
This was applied heavily to the metal areas. I want it to have depth, but also be a bit dirty.
Step 25: Macragge Blue
For the Space marine helmet on his belt. My daemon prince's favored prey come in Ultramarines flavor.
Step 26: Calgar Blue
A quick highlight for that helmet.
Step 27: Agrax Earthshade
For the helmet. I'm not looking to make the helmet look the same as one worn by an actual Ultramarine. This one's been there for a bit, worn down, and dirtier.
Step 28: Tamiya Clear Red
Blood. Tamiya's clear red is easily the best thing I've seen for blood and gore. Nothing in the Citadel line compares. This was applied on the armour around the skulls, near the tip of the sword, and around that weird gun-like opening on the back of his left gauntlet. I imagine it is some kind of projectile weapon, one that sprays blood and daemonic ichor. There are also a few places where this was splattered on. Easiest way to do that is to get a big gob of it on your brush, hold it an inch from where on the model you want it splattered, then blow the glob off the brush. Messy, but it works. I was cued on to this tip via another blog (Tale of Painters) and thought to give it a try, so this was my first shot at it.
Step 29: Ulthuan Grey
The last real detail I'm going to hit here is some of the eyes in his armor. This is the base. While I had it out, I used it to paint two pinpoints as his actual eyes. I like my daemon eyes to be beady and small. It makes them look so much more sinister, IMO.
Step 30: Yriel Yellow
I applied this to the middle iris area for the eye.
Step 31: Abaddon Black
I applied this as a slitted pupil.
Step 32: Bloodletter glaze
Covered the eye. I was going for an irritated look.
Step 33: White Scar
Last touch was a small line along the upper edge for light reflection.
There it is, the model's done. I based him up to match with the rest of my Chaos Space Marines (sand, brown wash, orange drybrush). With the base being so large, I added a few pieces of slate to break it up and keep it interesting.
I'd love to know what you all think. Helpful? Worthwhile? Interesting, at the very least?


